UPDATE

现在在读博士,方向Computer architecture,具体而言GPGPUs architecture。个人主页 (http://zhaoxiahust.github.io/)。

Xwindows和一些编码


Xwindows--X server:
一个程序,它在某台机器上运行,接受远方clinet的请求,画出请求的图形。并把得到的响应发送给client,以便使得client知道下一步的动作,并把相应信息返还给server,以便更新图形。
 
本机telnet 启动服务器sun服务器,sun服务器的监听进程fork出telnet进程服务请求的机子.telnet进程fork出来两个,父进程负责与远方的机子通信,子进程exec成shell进程,解释执行父进程得到的命令,再将结果返回给远方的机子。
 
根据Xwindows原理,远方的机子应该是server,将收到的服务器的结果显示给用户看,Xwindows 的网络透明,本机telnet到多个远发的服务器,他们之间可以相互拷贝,使用鼠标选中一段字符,然后就可以在另外的程序里把该段字符粘贴过去,不论程序运行在什么地方。
 
窗口管理器:
窗口管理器是Gnome和KDE的一部分,主要功能:改变窗口大小,移动窗口,改变窗口的层叠顺序。
通常的x客户程序不需要知道有人想移动它,它只听窗口管理器的。你的窗口上的标题,按钮,全部都是窗口管理器提供的。关闭一个程序的窗口,是窗口管理器通知那个程序“有人要关掉你,你自己准备后事,然后退出吧”
 
系统的编码的问题在linux下经常遇到,例如windows下面的文件有时候名字和内容在linux下面是乱码,这主要是和linux的utf8编码与windows的gbk不同所导致的。在linux下面创建的文件默认是utf8,所以当用u盘拷贝到别人的windows机器时就变成了乱码。同理windows下面的问题拷贝到linux下面的问题,这可以通过mount 的时候增加转码的参数解决-o iocharset=utf8就ok了,这里的utf8是本地编码,可以通过locale命令实现

Latex xeCJK安装

最近在小某某的感召下用起了shell编程,进而拷来了texlive,中文支持的时候出了些小小的问题,现在分享下简单的解决方法。

先是利用安装盘里的texlive的包install.sh到本地硬盘,做得貌似就是复制i386的工作?

简单的英文文档支持没有问题,为了支持中文


cp -r /usr/local/texlive/2012/texmf-dist/tex/xelatex/xecjk  /usr/local/texlive/texmf-local/tex/xelatex/ 中,

注意root权限


利用texlive中的命令/usr/local/texlive/2012/bin/i386-linux/mktexlsr 更新包信息


简单的测试程序如下:

1.tex


\documentclass[12pt]{article}
\usepackage{xeCJK}
\setCJKmainfont{AR PL UKai CN}
\begin{document}
这是测试要显示的内容
\end{document}
 
利用xelatex命令
xelatex 2.tex 生成2.pdf

关于C语言的函数调用机制

今天在sina Weibo上看到一个人发的一道面试题目,有关于被调用函数中局部变量的若干问题。于是我回忆函数的调用机制,但是感觉有点模糊,以前在做MIT的JOS的时候碰到过,但是记忆有些模糊了,于是利用一个简单的程序进行了过程的重温。

OS是gentoo,GCC-4.5.3--gcc -S  *.c 进行反汇编


源代码如下


#include <stdio.h>

struct tree{
int a;
int b;
};//之所以定义结构体是想更深入的了解下
struct tree foo(int a, char b)
{
   struct tree m = {1,2};
   m.a = a;
   m.b = b;
   return m;
}

int main(void)
{
    int a = 2;
    char b = 3;
    struct tree m = {4,4}; 
    m = foo(a, b);
    a = m.a;
}
 
gcc反汇编后的代码:
	.file	"1.c"
	.text
.globl foo
	.type	foo, @function
foo:
	pushl	%ebp
	movl	%esp, %ebp
	subl	$20, %esp
	movl	8(%ebp), %ecx
	movl	16(%ebp), %eax
	movb	%al, -20(%ebp)
	movl	$1, -8(%ebp)
	movl	$2, -4(%ebp)
	movl	12(%ebp), %eax
	movl	%eax, -8(%ebp)
	movsbl	-20(%ebp), %eax
	movl	%eax, -4(%ebp)
	movl	-8(%ebp), %eax
	movl	-4(%ebp), %edx
	movl	%eax, (%ecx)
	movl	%edx, 4(%ecx)
	movl	%ecx, %eax
	leave
	ret	$4
	.size	foo, .-foo
.globl main
	.type	main, @function
main:
	pushl	%ebp
	movl	%esp, %ebp
	subl	$28, %esp
	movl	$2, -4(%ebp)
	movb	$3, -5(%ebp)
	movl	$4, -16(%ebp)
	movl	$4, -12(%ebp)
	movsbl	-5(%ebp), %edx
	leal	-16(%ebp), %eax
	movl	%edx, 8(%esp)
	movl	-4(%ebp), %edx
	movl	%edx, 4(%esp)
	movl	%eax, (%esp)
	call	foo
	subl	$4, %esp
	movl	-16(%ebp), %eax
	movl	%eax, -4(%ebp)
	leave
	ret
	.size	main, .-main
	.ident	"GCC: (Gentoo 4.5.3-r2 p1.5, pie-0.4.7) 4.5.3"
	.section	.note.GNU-stack,"",@progbits


其中指令比较有难度的就是

call 函数调用指令,在main函数中我们调用了foo函数,对应的汇编指令就是

call foo,操作系统做的工作就是sp=sp-4,然后将ip入栈,更换ip指向foo的指令


leave,将ebp的值赋给esp,然后pop出来ebp。注意pop 指令先读取出esp 对应栈单元的值,然后esp=esp+4;push指令先esp=esp-4,在将值存入esp所指的栈单元。


ret,函数返回指令,根据当前的esp读取出eip的值,然后返回主函数的指令


下面根据汇编代码和内存栈的变化说明程序的执行过程以及函数调用如何得到返回值

执行到调用call foo时内存栈的情况如下

注意leal    -16(%ebp), %eax ;将ebp-16的值赋给eax,通过记录结构体内存单元的地址实现返回值的使用。


call指令执行过后,执行到处理返回值之前,内存单元的情况如:

下面是函数是如何将返回值传递给主函数的

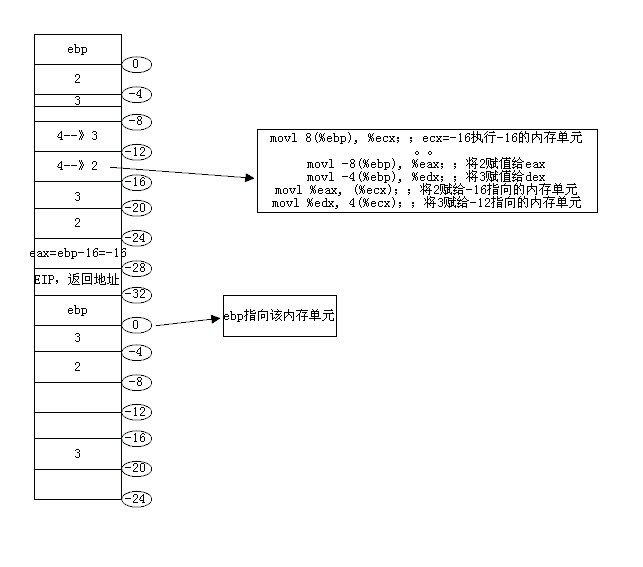
通过ebp,esp的变换,在调用函数中实现了返回值的传递。


下面执行到leave指令,复原esp,ebp,然后ret返回到main函数中。

上诉实验说明了很多东西以前貌似懂了,但是讲的话难度还是很大。反正赋闲在家,有心情的话还想把JOS重新做一边,顺便把很多书上的东西巩固一下。

fedora16源设置

安装插件yum install yum-fastestmirror,他会自动寻找最快的源《或者直接下载163的源,fedora-163.repofedora-updates-163.repo, 放入/etc/yum.repos.d/,将其他的源备份为.save》。第三方源

su -c 'yum localinstall --nogpgcheck http://download1.rpmfusion.org/free/fedora/rpmfusion-free-release-stable.noarch.rpm

http://download1.rpmfusion.org/nonfree/fedora/rpmfusion-nonfree-release-stable.noarch.rpm'

,主要是安装闭源驱动。

之后就是yum更新,今天找到了传说中的axel,多线程下载,TNND,真的很快。方法如下:

先yum install axel,然后下载yum相关配置文件

cd /etc/yum/pluginconf.d/
axel http://cnfreesoft.googlecode.com/svn/trunk/axelget/axelget.conf
cd /usr/lib/yum-plugins/
axel http://cnfreesoft.googlecode.com/svn/trunk/axelget/axelget.py

这样用yum更新就是多线程下载了。

更新过程中可能会出现:

错误详细:[Errno 14] Could not open/read file:///etc/pki/rpm-gpg/RPM-GPG-KEY-rpmfusion-free-fedora-15-i386

用yum update --nogpgcheck即可。

转自internet

autoscan autoconf自动生成 makefile

在lab文件夹下面建了三个.cpp文件

main.cpp 调用了check.cpp, getinfo.cpp里面的自定义函数


1.首先执行autoscan

将生成的configure.scan改名为configure.in


修改后的为


#                                               -*- Autoconf -*-
# Process this file with autoconf to produce a configure script.
 
AC_PREREQ([2.65])
AC_INIT(AI, 1.0, zhaoxiahust@gmail.com)
AC_CONFIG_SRCDIR([getinfo.cpp])
AC_CONFIG_HEADERS([config.h])
AM_INIT_AUTOMAKE(AI,1.0)
# Checks for programs.
AC_PROG_CXX
 
# Checks for libraries.
 
# Checks for header files.
 
# Checks for typedefs, structures, and compiler characteristics.
 
# Checks for library functions.
 
AC_OUTPUT([Makefile])
 
其中需要注意的是AC_PROG_CXX为c++编译器
如果是.c文件则为AC_PROG_CC


2.运行aclocal生成一个“aclocal.m4”文件和一个缓冲文件夹autom4te.cache,该文件主要处理本地的宏定义。
3.运行autoconf,生成configure
 
4.运行 autoheader,它负责生成config.h.in文件。该工具通常会从“acconfig.h”文件中复制用户附加的符号定义,因此此处没有附加符号定义,所以不需要创建“acconfig.h”文件。
 
创建一个 Makefile.am.这一步是创建Makefile很重要的一步,automake要用的脚本配置文件是Makefile.am,用户需要自己创建相应的文件。之后,automake工具转换成Makefile.in。
 
 
Makefile.am内容
AUTOMAKE_OPTIONS=foreign
bin_PROGRAMS=AI
AI_SOURCES=getinfo.cpp main.cpp check.cpp
 
 
使用automake对其生成“configure.in”文件,在这里使用选项“—add-missing”可以让automake自动添加有一些必需的脚本文件。
 
5.运行automake --add-missing
6.运行./configure,在这一步中,通过运行自动配置设置文件configure,把Makefile.in变成了最终的Makefile。
7.make
生成可执行程序AI
 
OVER


补充:

今天又将文件分在了source和include目录虾米,唯一要改的就是AI_SOURCES=source/getinfo.cpp source/main.cpp source/check.cpp

这个地方


因为又涉及到了简单多线程编程,所以要用到pthread库,但是由于不是linux的默认链接库,所以要在Makefile.am中添加

AI_LDFLAGS=-lpthread


_LDFLAGS:链接选项,对应gcc命令的-L,-I,-shared等选项


还要在configure.in中添加


# Checks for libraries.
AC_CHECK_LIB([pthread], [main])


Qt client__server代码实现

在用QT做网络实验,client,server程序,按照官方教程刚开始出现了问题,只能本地端口通信,bridge连接的virutualbox中的机子不能和外面通信,搞了N久,终于发现了问题所在,代码如下

server


server.h


#ifndef server
#define server
#include <QDialog>
#include <QtNetwork>
class QLabel;
class QLineEdit;
class QPushButton;
class Server : public QDialog
{
Q_OBJECT
public:
Server(QWidget *parent = 0);
QLabel *ListenLabel;
QLineEdit *ListenLineEdit;
QPushButton *ListenButton;
QTcpServer *tcpServer;
QTcpSocket *tcpSocket;
private slots:
void mylisten();
void read();
void con();
};
 
#endif
 
 
////////////////////////////////////////////////////////////////////////////////////////////////////////////////////////
 
server.cpp
 
#include <QtGui>
#include <QtNetwork>
 
#include "server.h"
 
Server :: Server(QWidget *parent)
:QDialog(parent)
{
    QString str;
    QHostInfo info = QHostInfo::fromName(QHostInfo::localHostName());
    QHostAddress address = info.addresses().first();
    str = address.toString();
    QLabel *name = new QLabel(QString("my ip is: ") + str);
tcpServer = new QTcpServer;
ListenLabel = new QLabel(tr("Listen Port"));
ListenLineEdit = new QLineEdit;
ListenLineEdit->setValidator(new QIntValidator(1,65535, this));
 
ListenLabel->setBuddy(ListenLineEdit);
ListenButton = new QPushButton(tr("Listen"));
 
connect(ListenButton, SIGNAL(clicked()), 
this, SLOT(mylisten()));
 
// tcpServer->listen(QHostAddress::LocalHost, 8000);
// connect(tcpServer, SIGNAL(newConnection()), this, SLOT(con()));
// QMessageBox::warning(NULL,"fe", "af", QMessageBox::Yes | QMessageBox::No, QMessageBox::Yes);
QVBoxLayout *mm = new QVBoxLayout;
    mm->addWidget(name);
mm->addWidget(ListenLabel);
mm->addWidget(ListenLineEdit);
mm->addWidget(ListenButton);
 
setLayout(mm);
}
void Server::mylisten()
{
QString port;
if(ListenLineEdit->text().isEmpty())
return;
 
port = ListenLineEdit->text();
 
tcpServer->listen(QHostAddress::Any, port.toUShort());//网上教程都是local,无疑两台机子不能通信,窘
 
connect(tcpServer, SIGNAL(newConnection()), this, SLOT(con()));
 
}
void Server::con()
{
tcpSocket = tcpServer->nextPendingConnection();
// QMessageBox::warning(NULL,"fe", "af", QMessageBox::Yes | QMessageBox::No, QMessageBox::Yes);
connect(tcpSocket, SIGNAL(readyRead()), this, SLOT(read()));
}
void Server::read()
{
QByteArray byte;
byte = tcpSocket->readAll();
 
QDialog *mm = new QDialog;
unsigned short aa = tcpSocket->peerPort();
QLabel *port =  new QLabel(QString("sender send Mesg throug his port is %1").arg(aa)); //peer send through the port
QLabel *address = new QLabel(QString("client Adderss is") + tcpSocket->peerAddress().toString());
QLabel *Message = new QLabel(QString("Message is: ") + QString(byte));
 
QGridLayout *bb = new QGridLayout;
bb->addWidget(port,0,0);
bb->addWidget(address,1,0);
bb->addWidget(Message,2,0);
 
mm->setLayout(bb);
mm->show();
}


////////////////////////////////////////////////////////////////////////////////////////////////////////////////////////
 
main.cpp
 
 
#include <QApplication>
 
#include "server.h"
int main(int argc, char **argv)
{
QApplication app(argc, argv);
Server mm;
mm.show();
return mm.exec();
 
}


///////////////////////////////////////////////////////////////////////////////////////////////////////////////////////////////////

Clinet端代码


client.h


#ifndef BLOCKINGCLIENT_H
#define BLOCKINGCLIENT_H
 
#include <QDialog>
#include <QtNetwork>
class QDialogButtonBox;
class QLabel;
class QLineEdit;
class QPushButton;
 
class Client : public QDialog
{
Q_OBJECT
public:
Client(QWidget *parent = 0);
private slots:
void sendMessage();
void send();
void con();
void wrong();
private:
QLabel *hostLabel;
QLabel *portLabel;
QLabel *MessageLabel;
QLabel *statusLabel;
QLineEdit *hostLineEdit;
QLineEdit *portLineEdit;
QLineEdit *MessageLineEdit;
QTcpSocket *socket;
QDialogButtonBox *buttonBox;
QPushButton *sendMessageButton;
QPushButton *connectButton;
};
#endif


////////////////////////////////////////////////////////////////////////////////////
client.cpp
 
#include <QtGui>
#include <QtNetwork>
 
#include "client.h"
 
Client::Client(QWidget *parent)
:QDialog(parent)
{
socket = new QTcpSocket;
hostLabel = new QLabel(tr("&Server name:"));
portLabel = new QLabel(tr("S&erver port"));
MessageLabel = new QLabel(tr("Message to send"));
statusLabel = new QLabel(tr("Would show the Error code"));
QString ipAddress;
 
 
hostLineEdit = new QLineEdit;
portLineEdit = new QLineEdit;
MessageLineEdit = new QLineEdit;
 
portLineEdit->setValidator(new QIntValidator(1, 65535,this));
 
hostLabel->setBuddy(hostLineEdit);
portLabel->setBuddy(portLineEdit);
MessageLabel->setBuddy(MessageLineEdit);
 
sendMessageButton = new QPushButton(tr("send"));
sendMessageButton->setEnabled(false);
connectButton = new QPushButton(tr("connect"));
buttonBox = new QDialogButtonBox;
 
buttonBox->addButton(connectButton, QDialogButtonBox::AcceptRole);
buttonBox->addButton(sendMessageButton,QDialogButtonBox:: AcceptRole);
 
 
connect(connectButton, SIGNAL(clicked()), this, SLOT(con()));
connect(sendMessageButton, SIGNAL(clicked()), 
this, SLOT(sendMessage()));


QGridLayout *mainLayout = new QGridLayout;
mainLayout->addWidget(hostLabel, 0, 0);
mainLayout->addWidget(hostLineEdit, 0, 1);
mainLayout->addWidget(portLabel, 1, 0);
mainLayout->addWidget(portLineEdit, 1, 1);
mainLayout->addWidget(MessageLabel, 2, 0);
mainLayout->addWidget(MessageLineEdit,2,1);
mainLayout->addWidget(buttonBox, 3,0,3,1);
mainLayout->addWidget(statusLabel,6,0);
setLayout(mainLayout);
setWindowTitle(tr("send client"));
}
 
void Client :: con()
{
QString host;
QString port;
QString Message;
if(hostLineEdit->text().isEmpty() || portLineEdit->text().isEmpty() || MessageLineEdit->text().isEmpty())
return;
 
host = hostLineEdit->text();
port = portLineEdit->text();
Message = MessageLineEdit->text();
// QMessageBox::warning(NULL, host, port, QMessageBox::Yes | QMessageBox::No, QMessageBox::Yes);
 
socket->connectToHost(host,port.toUShort());
 
// socket->connectToHost(QHostAddress::LocalHost,port.toUShort());
// socket->write(qPrintable(Message));
connect(socket, SIGNAL(connected()), this,SLOT(send()));
connect(socket, SIGNAL(error(QAbstractSocket::SocketError)), this, SLOT(wrong()));
}
 
void Client::wrong()
{
statusLabel->setText(QString("Error code %1").arg(socket->error()));
}
void Client::send()
{
sendMessageButton->setEnabled(true);
}
void Client :: sendMessage()
{
 
QString Message;
Message = MessageLineEdit->text();
socket->write(qPrintable(Message));
}


////////////////////////////////////////////////////////////////////////////////////////////////
main.cpp
 
#include <QApplication>
 
#include "client.h"
 
int main(int argc, char **argv)
{
QApplication app(argc, argv);
Client kain;
kain.show();
return kain.exec();
}


还有就是在.pro文件中加上 QT += network不然什么TCPserver之类的找不到